Enjoy connectivity with your computers by simply following these steps to add them to your network.
There are three (3) different ways of adding computers to the network:
NOTE: Images and steps may vary depending on the version of your Operating System (OS).
Step 1:
Locate the Wireless Network Connection option on your computer and select your Belkin router's wireless network name.

Step 2:
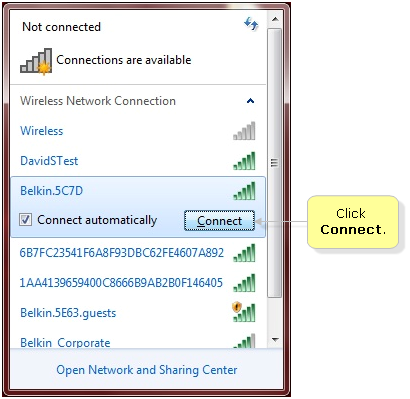
Click Connect. If you want your computer to automatically connect to the network every time it is available, tick the box for Connect automatically.
Click Connect. If you want your computer to automatically connect to the network every time it is available, tick the box for Connect automatically.
Step 3:
Enter your Security key or Network password from the network information card and click OK.
Enter your Security key or Network password from the network information card and click OK.

Step 1:
On your computer’s Network and Sharing Center, select Manage wireless networks.
On your computer’s Network and Sharing Center, select Manage wireless networks.

Step 2:
On the Manage Wireless Networks page, click Add.
On the Manage Wireless Networks page, click Add.

Step 3:
On the How do you want to add a network? pop-up, click Manually create a network profile.

Step 4:
You may now enter the information of the wireless network you want to add. The information entered should match the wireless network’s information. After filling in the information needed, click Next to add your wireless network.

Step 1:
Locate and activate the Wi-Fi Protected Setup™ Push Button Connection (WPS PBC) on the computer you wish to add to your network. Refer to your computer's user manual if you need help in locating the WPS PBC.
Locate and activate the Wi-Fi Protected Setup™ Push Button Connection (WPS PBC) on the computer you wish to add to your network. Refer to your computer's user manual if you need help in locating the WPS PBC.
Step 2:
Within two (2) minutes of activating the WPS PBC on your computer, press the WPS button on your router.
Within two (2) minutes of activating the WPS PBC on your computer, press the WPS button on your router.

NOTE: The small WPS light just above the WPS button (not to be confused with the green status light) shows what is happening while the router establishes a connection.
-
Off: Idle
-
Blinking Green: The router is looking for a WPS-enabled computer.
-
Solid Green: The router has made a secure connection with the WPS-enabled computer.
-
Blinking Amber: A connection was not made.
Step 3:
Repeat this process for each WPS-enabled computer you'd like to add to your network.
Repeat this process for each WPS-enabled computer you'd like to add to your network.


