The 2nd gen Wemo Mini comes with the Apple® HomeKit™ code that lets you control your Wemo Mini using the Apple Home app. This article will guide you through steps in setting it up.

Before you begin:
- Know your default Wemo Wi-Fi name which is located on the product label at the back of the Wemo Mini. The name will appear as Wemo.Mini.xxx, where xxx is the last three digits of the serial number.
- Determine if you have a 1st or 2nd gen Wemo Mini by checking if it has an Apple HomeKit code sticker at the back.
- Without sticker - 1st gen

- With sticker - 2nd gen

- Write down your Apple HomeKit code. If your device does not have a HomeKit code sticker, click here instead for setup instructions.
- Know the settings of your existing Wi-Fi (name and password).
- Make sure to have the latest Wemo App available on the App Store®.
Step 1: Launch the
 App.
App.Step 2: Tap on Add a Wemo.

NOTE: You can also tap the More tab beside Rules and tap on Add a Wemo from there.

Step 3: Select Wemo SmartPlugs.

Step 4: Tap on Continue With Setup.

Step 5: Plug in your Wemo and tap on It’s Plugged In.

Step 6: Wait for the status light to alternately blink orange and white. This signifies that the Wemo Mini is ready for setup. Tap on It’s Ready for Setup.

Step 7: Tap on Set Up.

Step 8: Locate your HomeKit code and scan it.
NOTES:
- The Wemo Mini should NOT BE UNPLUGGED during this step, otherwise setup will fail.
- If your Wemo doesn’t have a HomeKit code, you can set this up through this link instead.

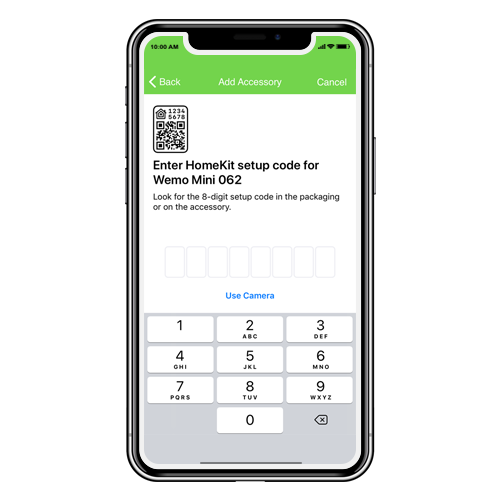
To manually enter the HomeKit code, tap on Don’t Have a Code or Can’t Scan? link at the bottom. Then tap on the Enter code... link.

Enter the HomeKit code then tap Done at the top.
NOTE: If you did not write down the code or can’t scan it while it’s connected to a power source, you will need to unplug the Wemo Mini, write down the code and restart your iOS device (power it OFF and turn it back ON) and begin setup all over again.
Wait for it to connect.

Step 9: Personalize the name of your Wemo Mini then tap on Next.

Step 10: If prompted, enter a valid email address and tap Next.
NOTE: Unless the Wemo App has been uninstalled then reinstalled on your mobile device, your email address will only be verified once.

Step 11: If prompted, select your Wi-Fi and connect to it with a password.
Setup is now complete. Your Wemo Mini should now be ready to use and is now connected to the Apple Home app.


